How to make your own e-Juice
Making your own vape e-liquid is easyer then you might think. DIY e-juice is a creative and cost-effective way to vape. When you create your own DIY e-juice you get do decide the flavor and its easy to vary the ejuice after your own preferance.
This guide will teach you how to create your very own e-juice. We will cover all ingredients and supplies you need, vape calculators, the different methods of mixing, steeping the e-juice and other tips and tricks.
DIY E-Liquid Ingredients
Propylene Glycol (PG)
PG is a base liquid common in most DIY e-juices. It is an organic liquid that is extracted from vegetables. Still, some people are allergic to PG. It is a certified, odorless, colorless, and most importantly organic compound that is used when preparing various products such as tobacco, candy, foodstuffs and so on. PG is also commonly used with medicinal compounds used for inhalation, injection, oral, and topical consumptions.
Vegetable Glycerin (VG)
VG is thicker than PG and is characterized by a slight tinge of sweetness. It’s VG and not PG which affects the overall flavor of the e-liquid. VG is certified Food and drug authorities for use in foodstuffs, e-liquids, cosmetics, et al. Both VG and PG are used when preparing e-juices as each offers peculiar properties to the mixture.
Flavoring
There is a broad variety of flavors, but to give your own vape juice the sweetest taste, flavors prepared purposely for inhaling are recommended rather than the common food flavors. Whereas the majority of mix will require about 10% – 20% of the content flavorings, some varieties are sufficiently strong to need only 5%.
Nicotine
Diluted nicotine liquid is available in different strengths. If it is your first time preparing vape juice, you are advised to make a selection of any nicotine whose strength lies between 8 mg and 24 mg, make experiments with it to determine the spot that makes the sweetest e-juice. Nicotine liquid should be handled with great care to prevent ingesting it resulting in nicotine overdose.
The easiest way to start creating DIY e-juice
To get started you will need the following: base liquid consisting of PG and VG, nicotine, and flavor concentrates. This could sound a little overwhelming, but it’s not as hard as you might think. You will not need any advanced knowledge of chemistry to do this.
The simplest way to get started making vape juice (step by step):
- Get some propylene glycol and vegetable glycerine (PG and VG) or get a bottle of pre-made base. We recomend that you get at least 100 ml of each.
- Also get a few 60 ml gorilla bottles and a couple of e-juice injectors to your cart.
- Take a look at the DIY vape juice flavorings and select a few that appeal to you.
- Then when your package arrives, use the concentrates pipettes and drip about 10-20 drops of flavoring in one of the empty bottles.
- Fill the bottle up to about 1/3 with PG and the rest with VG. Or simply fill it all up if you have pre-mixed base liquids.
- Shake your bottle very well and then set it aside for a few hours to let it steep.
- Now for the fun part, trying your e-juice out! If you feel the need to, then adjust to taste by adding more of one or more of your concentrates.
- Another way to get inspiration is to find a recipie on for example e-Liquid Recepies. Then use the e-juice injectors to add the required amount of flavorings.
Now you have 50 ml of your own home made e-juice! At first your e-juices might not be all that spectacular but as you learn more you will get better and better at mixing. A good way is to try your concentrates one by one by adding a few drops into a 10ml bottle and then try to vape it, that way you will get to know the taste of every essence that you are using. This will make it easyer to dose the flavourings.
If you want to start adding nicotine to your e-juice, we recomend that you use a nicotine calculator to get the right amount.
Mix DIY e-juice using volume or by weight
There are two ways of mixing DIY e-liquids and they both come with some pros and cons.
Mixing e-juice by weight: here you will need to use a scale and each ingredient is added by weighing it and taking its specific gravity into account. Simply put, an ml of VG is heavier than an ml of PG or an ml of concentrate. This is abit more advanced then using volume. Make sure to you use a e-juice calculator that factors in these values and let it do the numbers.
Mixing e-juice by volume: with this method you measure each ingredient’s volume with the use of e-juice injectors (ideally one per different ingredient). This is the easiest way to understand for a beginner but it is also abit less accurate and requires more supplies and cleaning. If you want to use a free E-juice calcylator we can recomend E Juice me Up. Just enter the % you want for each ingrediant and it will tell you how many ml to use. If you are planning on using it for mixing by weight, make sure you click on Tools and then Grams Set. To save some time, I suggest using ELR’s default values there:
- PG: 1.036 g/ml
- VG: 1.261 g/ml
- Flavoring: 1.000 g/ml
- Nicotine: 1.036 g/ml (if PG-based), 1.261 g/ml (if VG-based)
Nicotine – Nicotine is of cause optional to use. Depending on your preferred nicotine level, you should buy a suitable nicotine liquid. In EU we are limited to a maximum of 20mg/ml nicotine. You should be very careful when handling and using nicotine liquids. Make sure you keep high-strength nicotine away from your skin and your face (and pets & children). Use protective gloves and safety goggles when handling nicotine. Use a nicotine calculator to decide the amount of nicotine to add.
- Storing your bottles – Store your base liquid in individual squeeze bottles with nozzle tips to make it easy to add to your homebrew. A couple of 100 ml bottles should do it.
- E-juice bottles – For your first tries you could get some 10 ml plastic bottles to test out your recipes and then some 60 mL bottles to make larger batches of your favorites. PET and HDPE plastic are your best choices for long-term storage.
- Gloves – Make sure to always have some disposable gloves at hand. These are invaluable and available everywere.
The rest of the equipment depends on which mixing method you choose:
- E-juice injectors for mixing by volume – You should never use the same syringe with different liquids, that will mix the flavors. So make sure to have atleast one injector to each flavor/base liquid. You can wash them with hot water afterwards, just make sure that they are completely dry before re-using them again.
- A scale for mixing by weight: you’ll need an electronic scale with a 0.01-gram precision. This is accurate enough to deal with all DIY e-liquid recipes. You should also make sure that the scale can weigh at least up to 200 grams, and ideally 500 grams—you may think that 100 grams is enough, but if you ever decide on mixing larger quantities or use glass bottles you will need the extra headspace.
Some ingredients to avoid
There are some ingredients are not suitable for use with e-liquids and should be avoided.
- Flavoring that’s not widely used in e-juice DIY (potentially dangerous).
- Essential oils, and any type of oil (certainly dangerous to inhale).
- Any type of household item that might seem like a good idea (it is not).
- Very high-strength nicotine (nicotine is potentially leathal in high doses).
A few ingredients that is debated are distilled water and vodka. Some people use them to dilute the e-liquid, but today our vape gear is not made for this ingrediants. We strongly advise that you stay away from anything other than VG and PG when it comes to base e-liquid.
Now it’s time to make some e-juice!
By now you’ve got all the required ingredients and supplies, and now it’s time to start the mixing! You can start by using your gut feeling and simply try mixing some flavourings and se what happends. You can also visit some e-juice recepie sites, for example e-liquidrecpies.com (ELR). There you can rank recipes by ratings for some tried mixes. You can also create an account and add the concentrates that you have and then it will show you what recepies you can make with them.
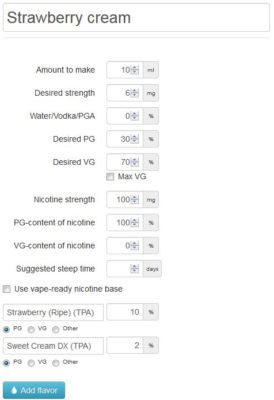
Then you can use ELR’s calculator. Start by filling in the milliliters, nicotine (in mg) and base liquid ratio of the final product you’re shooting for, and the strength and ratio of the nicotine you have. For this example, I am going for 60 ml, 70VG, and 3 mg nicotine, and I am using a 20 mg 100% PG nicotine base. Then add the percentages of the flavors you want to use.
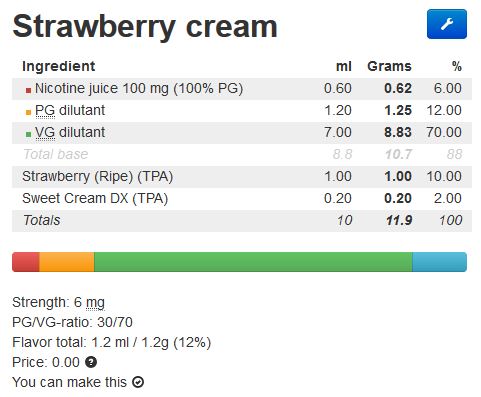
Then you have all the stats and can now start to mix your own e-juice!
If you are mixing by weight, you’ll need to use the values inside the “Grams” column. Turn on your scale, put the plastic bottle on it, and press the “tare” button to reset it to 0.00 grams. Then add the listed amounts of each ingredient, pressing “tare” after each one.
If you are mixing by volume, use the values of the “mL” column. You should use one injector per ingredient (or you will mix the flavourings). After you are done mixing you have to clean your syringes by using distilled water. And remember to let them dry before you use them again.
Finally put the cap on your bottle and shake it very well. Congratulations, now you have your very first homemade bottle of DIY vape e-juice!
What to do after you are done mixing
Labeling – You might want to label your e-juice bottles, perhaps give it a cool name? Also write the stats like:VG/PG ratio, nicotine level, flavor percentages, and when you created it. Dont forget to save your recepie on for example e-liquid-recipes.com.
Steeping your e-juice – Steeping is something that might sound confusing but it’s really quite simple. Most homemade e-liquids that contains more than one flavor needs a certain amount of time to let the flavors blend and settle (steep). This is different for every mix, but mostly for multi-layered dessert or cream-based mixes. They need up to four weeks to reach their best flavor, while simple fruit recipes might not need any steep time at all.
Testing your e-juice – When your e-juice has steeped, it’s time to test it out. If you have an RDA, its easy to do quick testing without having to waste coils on failed recepies and allows you to sample e-juices quickly. But please note that coil ohm and wattage can greatly affect the flavor, it might taste great at 80 watts on a 0.3-ohm RDA but is likely to taste very different in a 1.8-ohm tank at 15 watts.
Storing your e-liquids – You will want to keep the e-juice away from sunlight, heat, and oxygen since it can have a negative impact on it. It is best to store your homemade e-juice in a cool dark place. And make sure they’re safely out of reach of children and pets.
DIY e-juice tips and tricks
- It is not necessarily better to use larger amounts of flavorings, in some cases, overdoing it will end up muting the flavor of your e-liquid!
- Some concentrates does not taste well together, this you will find out.
- Flavors is likely to be differant from brand to brand, one brand’s “Strawberry” might be a realistic ripe strawberry while another’s might be a candy or something else.
- Concentrate potency varies not only between brands but even for flavorings of the same brand. Companies like Flavourart and Inawera are notorious for their potent concentrates, where 1-2% is more than enough to dominate a recipe—but even some of theirs can be used in the 5-10% range. A good indicator of potency is the “average mixing quantity” percentage, which can be found on each flavor’s page at ELR.
- When you have tested your e-juice out, make notes! Whas it to weak on the blueberry or to high on the sweetener? Keeping detailed notes will help improve your future e-liquid mixes and improve your DIY e-juice mixing skills.
We hope this guide has been helpful! If you have any questions, don’t hesitate to contact us.