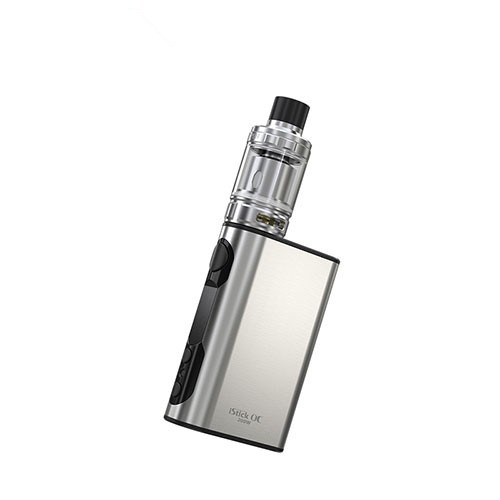
Eleaf iStick QC 200W with Melo 300 Kit 5000mAh
The iStick QC 200W comes with a massive 5000mAh built-in battery giving it a powerful 50A/200W maximum output. Stylish, sustainable and powerful, the iStick QC 200W also features a 1.5A quick charging capability when using the Avatar Quick Charger. The innovative RC adapter (optional accessory) will convert the iStick QC 200W’s 510 connection into a USB output for Power bank mode when necessary. With a retractable top fill and powerful ES coils, the MELO 300 pairs with the iStick QC 200W perfectly for cloud chasing.
Eleaf iStick QC 200W with Melo 300 Kit
Product introduction
The iStick QC 200W comes with a massive 5000mAh built-in battery giving it a powerful 50A/200W maximum output. Stylish, sustainable and powerful, the iStick QC 200W also features a 1.5A quick charging capability when using the Avatar Quick Charger. The innovative RC adapter (optional accessory) will convert the iStick QC 200W’s 510 connection into a USB output for Power bank mode when necessary. With a retractable top fill and powerful ES coils, the MELO 300 pairs with the iStick QC 200W perfectly for cloud chasing.


Parameters
iStick QC 200W Mod:
Size: 52mm x 25mm x83mm
Battery capacity: 5000mAh
Battery cell type: 213565
E-liquid capacity: 3.5ml
Thread type: 510 thread
Output wattage: 1-200W
Output voltage: 0.5-9V
Maximum charging current: 1.5A
Maximum output current: 50A
Output mode: VW/Smart/TC(Ni,Ti,SS,TCR-M1,M2,M3)
Resistance range: 0.05-1.5ohm (TC modes); 0.1-3.5ohm (VW/Smart mode)
Temperature range: 100-315℃/200-600℉(TC modes)
MELO 300:
Diameter: 26mm
Height: 55mm
E-liquid capacity: 3.5ml
Thread type: 510 thread
Coil: Sextuple 0.17ohm coil (100 – 300W)

It comes with
- 1x iStick QC 200W Mod
- 1x Melo 300 tank – 3.5ml (pre-installed ES Sextuple-0.17ohm head)
- 1x ES Sextuple-0.17ohm head
- 1x Set O-rings
- 1x Warning card
- 1x QC USB cable
- 2x User manual

Features
A Heaven-made match of huge power for cloud chasing
Powerful 50A/200W output and massive 5000mAh capacity
1.5A Quick charge capability & power bank mode
Dual circuit protection for charging
New ES Sextuple-0.17ohm Head for Ultra High Power
Convenient Retractable Top Fill System
Optimal Airflow for Massive Vapor Clouds
Detachable Structure for Easy Cleaning


Operation Guide
Power on/off: press the fire button 5 times in quick succession to turn on/ off the device. Keep holding the fire button to take a puff when the device is powered on.
Stealth on/off: Press the fire button and down button simultaneously when the device is powered on to switch between stealth on and stealth off mode.
Adjustment buttons lock/unlock: Keep pressing up button and down button simultaneously for two seconds when the device is powered on, the the up and down buttons will be locked and the screen will display “Lock”. Repeat it to Unlock the buttons.
Switch display mode: Keep pressing up and down button simultaneously for two seconds when the device the powered off, the screen display will rotate 180 degree. You can view the screen from two different angles through this operation.
Preheat function: In power-off state, keep holding up and fire buttons till the M1 mode appears, press the fire button 3 times to “power” and press up or down button to adjust the wattage of preheat; press the fire button again to “time”, and press up or down button to adjust the second of preheat or turn off the preheat function.
Charge a cell phone: Screw an RC adapter (not included) on the device and connect it with a cell phone by a USB cable. When the device is powered on, press the fire button once to start to charge the cell phone.
Switch vaping modes: When the device is powered on, press the fire button 3 times in quick succession, the device will display current vaping mode. Press the up or down buttons to switch among VW/Smart/ USB charge/ TC-Ni/ TC-Ti/ TC-SS/ TCR-M1/ TCR-M2 and TCR-M3 modes.
Custom Logo: Download the file on Eleaf site, plug the device in with USB cable to a computer, and double click the Eleafupdate.exe. Then click “logo” and open the image you choose to put it in the device. Finally press the fire button twice in quick succession when the device is powered on to enter logo on/off interface and press up or down button one time to turn on/off logo.
How to use Melo 300:
1. Drip a few drops of e-liquid directly into the coils to make them fully saturated before first use;
2. Screw the primed atomizer head onto the atomizer base tightly;
3. Put the glass tube on, and screw the top cap with mouthpiece on;
4. Slide the mouthpiece back to reveal the fill port, slowly fill e-liquid into the tank through the port, and then close the retractable top after filling;
5. The airflow can be adjusted by rotating the airflow control ring on the atomizer base;
6. Finally the Melo 300 is ready to use.
| Weight | 2 g |
|---|---|
| Dimensions | 1 × 3 × 1 cm |
| Color | Silver, Green |
Share your thoughts!
Let us know what you think...
Only logged in customers who have purchased this product may leave a review. Log in now
Related products
Advanced Kits
Advanced Kits
Beginner Kits
Beginner Kits
Advanced Kits
Beginner Kits








What others are saying
There are no contributions yet.